Showing posts with label Bigz Alphabet Typeset. Show all posts

Friday, 7 February 2014

Hanging birthday planner...no excuses now!

Hello!
I don't know about you but I'm useless at remembering birthdays until it's too late, and when everyone now expects handmade cards that's no good! I saw a project somewhere a few weeks ago, no idea where though, and I totally loved it, so here is my take on it...


I have used mainly Sale-a-Bration freebie items to make this. Free DSP, free coloured string, free Banner stamp and punch.


I used the Bigz Alphabet Framelits and some of the Bermuda Bay DSP and  for the lettering and Petite Petals and Bitty Butterfly punches for the date tags. Each tag has the date and name of the birthday boy or girl on the front, and on the back I've put their year of birth, if known, to help remember 'big' birthdays.

I have hung this on the door to my airing cupboard...it brightens the hallway and I can't possibly miss those important birthdays! (I hope!)

If you would like to get your free Sale-a-Bration items simply visit my online store...for every £45 you spend you get to choose a free item from the Sale-a-Bration brochure and with 10 items to choose from you are bound to fall in love with something! 

Thanks for having a look today and please do come back tomorrow as there is another Pinkies Blog Hop to enjoy!


Thursday, 19 December 2013

Handmade Christmas decor!

Good morning!
Wow that was a storm last night wasn't it?! It got so bad that Keiran got frightened and had to sleep in my room bless him! I hope you are all safe and there hasn't been too much damage near you.

Whilst the storm was raging, I was doing what crafters do best....craft! And here is what I made!


I have been playing with the Milk Carton Bigz Die. This is an idea I have had for a while, but not had chance to finish it! 


I have used the Typset Alphabet Bigz to create the lettering, and each battery operated candle is covered with the lovely new gold washi tape from the upcoming Spring/Summer catalogue.

Here is the full garland...


It is all fastened together using Cherry Cobbler baker's twine and I have added a Frosted Finishes embellishment in between each letter. 


Isn't it lovely? And it is easy to turn the candles on and off through the holes in the sides, which were created using the 2nd smallest die from the Circles Collection Framelits.
Mini Milk Carton Bigz Die - by Stampin' Up! Typeset Alphabet Bigz Die  Frosted Finishes Embellishments
 Cherry Cobbler Bakers Twine - by Stampin' Up!Circles Collection Framelits Dies
Click on the images to buy directly from my shop.


I have a few challenges I would like to enter this into...

I'm off on the school run now...see you tomorrow! :)


Tuesday, 19 November 2013

A commissioned 90th

As you know, I have had a lot of commissions to make lately, and here is another one of them...


I have used my 'go to' most favourite paper ever, Twitterpated, and the Flower Shop stamp and Pansy Punch bundle.


The sentiment was computer printed and cut out using a Framelit from the Apothecary Accents set.

Supplies
Designer Paper - Twitterpated
Stamp - Flower Shop
Punch/Dies - Pansy Punch, Apothecary Accents, Typeset Alphabet Bigz

If you would like to buy any of the products I have used here, or in any of my projects, please do click through to my online shop using the link on my sidebar.

I am starting a new Stampers 6 club in January, just in time for the new Sale-a-Bration promotion, where you will receive free products for every £45 spend! If you would like to know more about Stampers 6, you can read about it hereor feel free to contact me with any queries.

I am entering my card into this challenge...

Thank you for popping by today. I hope you have a great day and see you tomorrow!


Saturday, 12 October 2013

DinoROAR!

Hello!
Here is another of my commission cards for you to see...


This is the gorgeous, but sadly retired, Dinoroar set, and I knew it would be perfect for this commission! I wanted it to be colourful so I had a little play with my Stampin' Write Markers.


I cut each of the little fellas out, and attached to the card, but I knew the Pterodactyl just had to fly, so I used some acetate from some packaging to attach him over the top of the card.


The background was created by 'stippling' Pool Party and Garden Green to create sky and grass. (remember this technique from the 90's decorating fad?!) 


If you would like to purchase any of the products I have used here, please do visit my online store where you can also be entered into this month's Mystery Hostess club for your chance to win this month's hostess freebies!

Alternatively, please feel free to contact me with your order, or any queries you may have. 

Thank you for popping by today! I hope you have a lovely weekend! :)


Friday, 11 October 2013

The drinks are on me!

Hello!
You'll be pleased to hear that today's card is a lot more 'me'! It's another commission to tick off my list. 


I've used some of the retired DSP from last year, but the stamp set, Happy Hour, is still current.


I used the Alphabet Typset Bigz die for the '40', and added Crystal Effects to the glasses for a bit of 'realism'.


If you would like to purchase any of the products I have used here, please do visit my online store where you can also be entered into this month's Mystery Hostess club for your chance to win this month's hostess freebies!

Alternatively, please feel free to contact me with your order, or any queries you may have. 

Challenges


Monday, 2 September 2013

A card for a very special lady!

Good morning!
I have a really feminine, girlie Birthday card for you today. This was a commission for a lady at church who turned 100 on Sunday...yes, 100! And let me tell you, she really does not look a day over 80! She still walks well, without a walking stick, barely has any wrinkles and doesn't even need glasses! One very incredible lady!!

Anyway, about the card...


I have used a bit of the gorgeous, but retired, Twitterpated DSP and teamed it with some of the lovely new ribbons, and the Stippled Blossoms stamp.


The sentiment was created in Word, using the Stampin' Up! RGB codes to get just the right colour (if you would like the codes, please contact me).

Supplies
Stamp - Stippled Blossoms
Ink - Primrose Petals, Pretty In Pink, Pear Pizzazz, Pistachio Pudding, Baja Breeze, Island Indigo, Blushing Bride, Pink Pirouette
Ribbon - Blushing Bride Stitched Grossgrain, Pistachio Pudding Ruffled Stretch Ribbon
Other - Designer Builder Brads

If you would like to get some of the lovely products shown here, or in any of my other posts, please do contact me and I will be delighted to order them for you.

Challenges
Card Sketch Pattern

I think this card would have been perfect for my Grandma for her birthday too. It would have been her 95th birthday today and I'm sure she'd have loved a card like this. Sadly, she passed away 2 and half years ago, but she is still missed. 
Happy birthday Grandma xxx


Monday, 15 July 2013

Best of Butterflies and Flower Garden

Hello and happy Monday to you all!
Wow I am busy with orders this week! I shall try and blog them all when I can.

Here is one of them...
This card is for a returning customer who has so far had 6 cards off me...it's nice to have customers coming back time and again :)


I have used a lot of die cutting and punching on this card - Ovals Framelits, Bigz Alphabet Typeset, Adorning Accents Edgelits, Pansy Punch, plus Lacy Brocade embossing folder - my Big Shot sure has been put through it's paces today!


The lovely Blushing Bride flowers are from the new Flower Garden stamp set, and the butterfly is from the stunning Best Of Butterflies.


I stamped my butterfly onto vellum for a soft, fluttery look.

Supplies
Stamps - Flower Garden, Best Of Butteflies
Ink - Blushing Bride, Pool Party
Dies/Punches - Ovals Framelits, Bigz Alphabet Typeset, Adorning Accents Edgelits, Pansy Punch
Embossing - Lacy Brocade EF


If you would like to order any of the products I have used, or any of the other fabulous new products, please do contact me and I will be very happy to place your order for you.

Please click on the catalogue link on my sidebar to browse the yummy new catalogue, or for £4.95 inc. p&p I can send you your very own copy to drool over and write your wishlist in!

Challenges

Right, work is calling. Hopefully I will have more to show you tomorrow!

Friday, 14 June 2013

Keiran's Need For Speed!

Good morning!
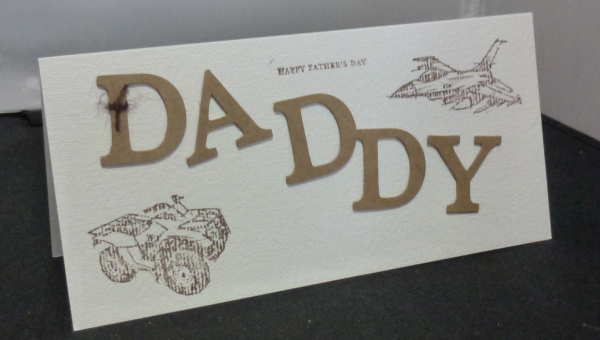
So, as predicted, I didn't get any crafting done last night! So instead I'm going to show you what Keiran (aged 5) made for his Daddy for Father's Day...


Isn't it fab?! He used all my Stampin' Up! supplies, and he even cut out the letters himself using my Bigshot and my Alphabet Bigz dies. He even stamped the jet and the quad from the Need for Speed set all by himself!

Supplies
Stamps - Need For Speed
Ink - Chocolate Chip
Dies - Bigz Typeset Alphabet

If you would like to find out more about the gorgeous Stampin' Up! products, or to order any, please do contact me and I will be happy to help!
I also hold Stampin' Up! parties and workshops, so if you would like to find out more, please don't hesitate to get in touch!

Challenges

I will definitely be back tomorrow...it's LIM day! ;)

Sunday, 19 May 2013

A 90th Birthday

Hello!
I have a card for a commission to show you today, using gorgeous vellum Papillon Potpourri butterflies and Secret Garden flowers...


I have used a lot of embossing, DSP, dies and inks on this card....probably one of the fussiest cards I've made in a while!


Supplies
Cardstock - Whisper White
Designer Series Paper - Subtles, Brights
Stamps - Papillon Potpourri, Secret Garden
Ink - Perfect Plum, Daffodil Delight, Lucky Limeade, Old Olive
Embossing - Versamark, Whisper White & Iridescent Ice Stampin' Emboss, Woodgrain EF
Punches/dies - Bitty Butterfly, Elegant Butterfly, Secret Garden, Bigz Alphabet Typeset, Word Window, Elegant Label

If you would like to find out more about the gorgeous Stampin' Up! products, or to order any, please do contact me and I will be happy to help!
I also hold Stampin' Up! parties and workshops, so if you would like to find out more, please don't hesitate to get in touch!

SPECIAL OFFER!! Order £250 of products and choose £65 worth of products FREE! Or join Stampin' Up! and choose £155 of goodies for only £99!!Contact me or see here for more details!

Challenges
PCCCS042-Sketch

Thanks for stopping by today. 
We had a fab day yesterday, and even managed to fit in a Dinosour safari!


Yes that is a Velosiraptor in the background! It is a life size statue in the front garden of a house quite near us!

 I have a day of gardening today after church...hope to get all my seedlings out if possible! Have a great Sunday! :)


Tuesday, 23 April 2013

Stamped Word Card Tutorial

Helllooo!
As promised, I have the tutorial here for the 'Thanks' card I entered into the Less Is More - Case it! challenge earlier this week. It is slightly trickier that the usual way that works for thin, single letter dies, as I have used a Bigz die, but it works and has a wonderful effect on your cards!

Ok, so you will need;

1 x DL card blank
Elements of Style stamp set
Stampin' Write Markers in Midnight Muse, Summer Starfruit and Gumball Green
Black inkpad
Bigz Alphabet Typeset letters
Stampin' Dimensionals
Pencil, ruler and rubber
and most importantly, Stamp-a-Majig!

fig 1. 
Cut out your chosen letters with your Bigshot

fig 2. 
Stamp your image in black ink onto your Stamp-a-Majig

fig 3. 
Ink up your stamp, picking out different areas with different colours

fig 4. 
Line up your Stamp-a-Majig to position your image on the card blank and then stamp your coloured image. 
*TIP* if your stamp appears to have dried a little before stamping, just 'huff' on it to re-activate the ink...it's water based so this works brilliantly!

fig 5.
Draw a line in pencil very softly across the card, for your letters to sit on to ensure they will be straight!

fig 6.
Re-align your Stamp-a-Majig image over the image on your card blank, making sure it is perfectly aligned. Tape down gently if you wish, remembering to use low tack tape! Then place your letters along the line you drew that you can see through the acetate stamped image. Again, use a little low tack or re-positional adhesive on the back of the letters if you wish to ensure they don't move.
*TIP*  If you position the letters just slightly above your pencil line it will make it easier to rub out later!

fig 7.
Now line up the Stamp-a-Majig 'arm' with the acetate.

fig 8.
Re-ink your stamp, then stamp onto the letters using the Stamp-a-Majig to guide you.

fig 9.
Carefully remove the stamp and allow letters to dry before removing the Stamp-a-Majig arm. 

fig 10.
You can then remove the letters and position them over your stamped image on the card blank, using Dimensionals to pop them up! Don't forget to rub out your pencil line too!
Et voila!! One beautiful and elegant card!!


 I really hope you have found this useful, and easy to follow. It may seem like a lot of work, but it's not really, honest! I would so love to see your version, if you give it a go so please do leave a link to your creation in the comments and I promise to come see! And don't forget to enter it into this week's Less Is More challenge too! :)

 If you would like to order any of the Stampin' Up items I have used here, please don't hesitate to contact me...I am always happy to help! 

I am entering this into SUO Challenges - Anything Sizzix!
Enjoy playing! :)